Joomla has one of the most versatile and detailed User Manager Systems around all of the CMS out there. You can store a detailed set of information for each of your users while being able to give them extremely detailed permissions for all of the possible administrative, or not, actions in your Joomla website.
In this tutorial we are going to cover the case where you want to add a new User through the administrator panel.
How to add a new User in Joomla
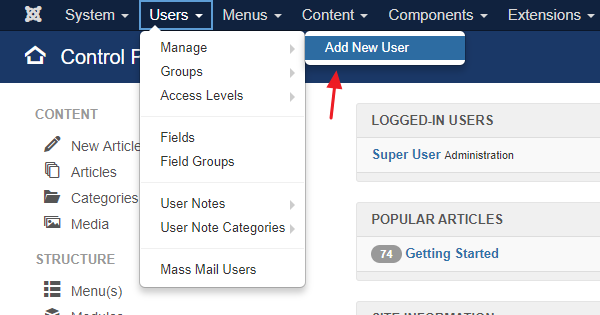
First, you need to log in to your administrator panel and navigate to Users > Manage > Add New User.

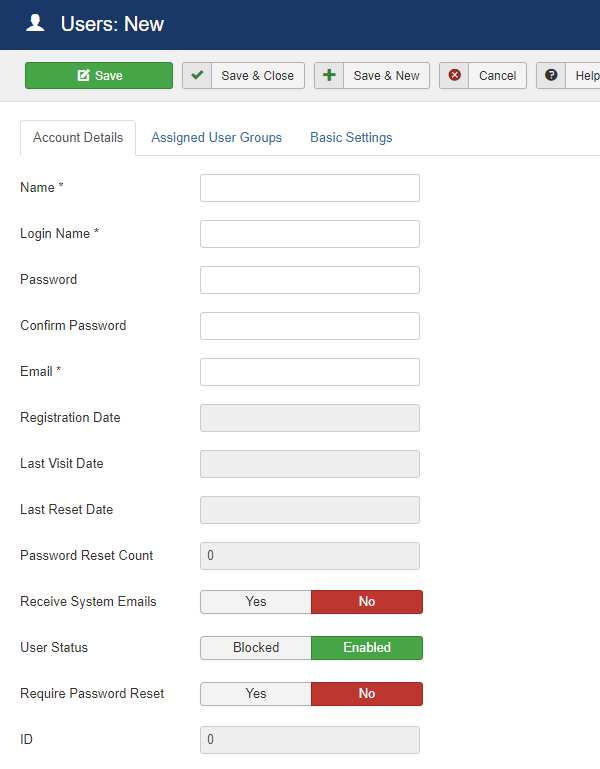
In this screen there is a set of 3 Tabs which are related with the functions of a User in Joomla. Let's analyze them one by one.
Account Details

-
Name: The full name of the User.
-
Login Name: Essentially the username of the User which will be used for logging in and out.
-
Password: The password of the User.
-
Confirm Password: Again the password of the User. This field's existence is to make sure that the Password is filled in correctly since you can only see a masked input while typing in a password.
-
Email: The email of the User. It is of great importance to type in an existing email as this is going to be used for all the communication between your Joomla website and your User.
-
Registration Date: The registration date of the User. This is filled in automatically upon creating a new User.
-
Last Visit Date: The last time the User visited your Joomla website. Bare in mind that this date does not get updated when the User isn't actually logged in.
-
Last Reset Date: The last time the User reset his password.
-
Password Reset Count: How many times the User has reset his password.
-
Receive System Emails: System Emails are mostly generated for administrators who need to be informed of events such as registrations of new users or pending updates.
-
User Status: The User Status is indicating whether the user is able to use his account or not.
-
Require Password Reset: You can set this to "Yes" if you want the next time the User logins to your website to be informed of a mandatory Password Reset. It is a strictly administrative action which is mostly being used for security reasons.
-
ID: The unique ID of the User which is automatically generated.
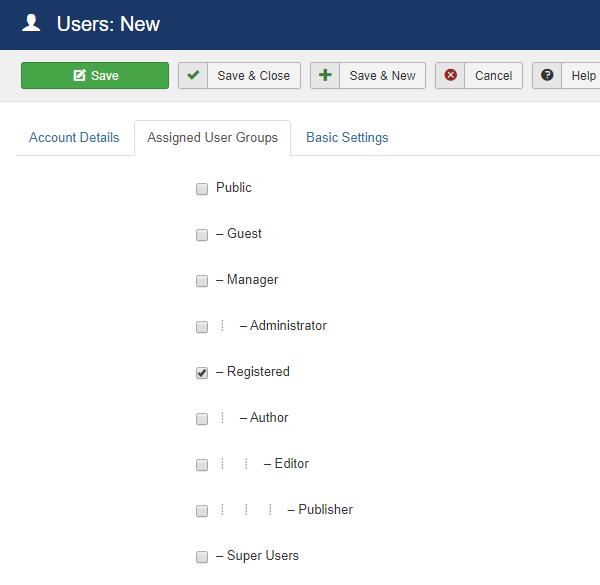
Assigned User Groups

In Joomla, users can be a part of one or many user groups. User groups are being used to differentiate the set of permissions for each and every one of them.
They appear to be hierarchical and it is generally a good idea to give them permissions in a hierarchical order, however it is not mandatory to be so.
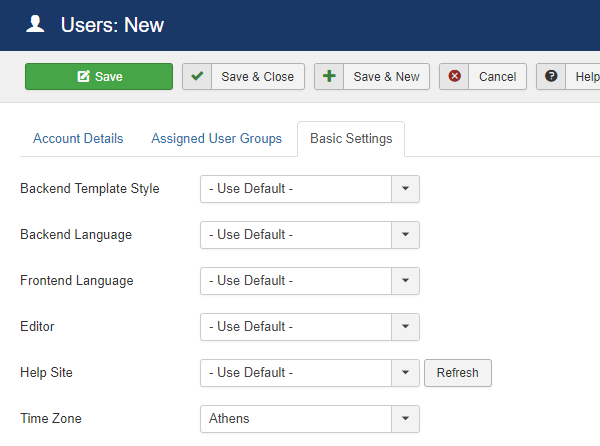
Basic Settings

-
Backend Template Style: A setting which allows the Uset to choose a specific backend template style. Joomla by default has the "Hathor" and the "Isis" template styles.
-
Backend Language: The preferred backend language in case the User's native language isn't English.
-
Frontend Language: The same as above only for the Frontend.
-
Editor: The WYSIWYG editor which is being loaded for all the article creating and editing. Joomla by default has the TinyMCE editor. You can also choose the CodeMirror editor which is perfect for those who want to write code directly, or you can choose No editor at all and be left with a simple large textfield.
-
Help Site: Which Help Site the User would like to get help from. By default, Joomla offers its official English and French Help sites.
-
Time Zone: The Time Zone of where the User is operating from.
Now that you know what each Tab does, you can fill in all the necessary information and click "Save" to finish creating your New User.
As you can see, Joomla provides an extensive approach to User Creation which gives Administrators the tools to manage them efficiently and securely.
If you liked our small tutorial about Joomla! User Creation, feel free to sign up to our Newsletter or even follow us on Social Media to be among the first to read our new content.